
Most desk pain isn’t dramatic. It doesn’t arrive with a specific injury. It accumulates — a tightness in the forearm that shows up by early afternoon, a neck that’s stiff by the end of the day, wrists that ache mildly in the evening and feel fine by morning. Quietly, gradually, until the pattern becomes normal enough that you stop noticing it’s there.
The cause is almost always the same: sustained awkward positions held for hours, repeated daily. Your wrists bent slightly upward on a keyboard set too high. Your shoulder reaching slightly outward for a mouse positioned too far right. Your neck tilted forward toward a screen that’s two inches too low. None of these feel like problems in the moment. Accumulated across hundreds of working hours, they become the source of the most common occupational health complaints among remote workers.
The good news is that most of that discomfort isn’t inevitable. It’s fixable. With the right adjustments to your chair, monitor, keyboard, and mouse, you can create a workspace that supports your body instead of working against it.
This guide covers the complete ergonomic desk setup for home office use, with particular focus on input devices — keyboard, mouse, and the accessories that complete the system. Every section links to in-depth guides on specific products and topics covered elsewhere on CircuitSeek.
Key Takeaways
- Workers with untreated RSI lose an average of 23 productive workdays per year — proper ergonomic setup is prevention that pays for itself
- Keyboard and mouse positioning form a connected system: keyboard placement determines mouse distance, mouse distance determines shoulder load, shoulder load affects neck and upper back tension
- The correct keyboard height puts your forearms roughly parallel to the floor with wrists neutral — not bent upward or downward; a slight negative tilt (front lower than back) can help maintain neutral wrist position
- Move your mouse within 3 inches of your keyboard — measuring how far you reach for your mouse from the keyboard identifies one of the most correctable sources of shoulder strain
- No ergonomic equipment substitutes for movement: take micro-breaks every 20–30 minutes to stand, stretch, and rest your eyes
The System Approach: Why Input Devices Can’t Be Configured in Isolation
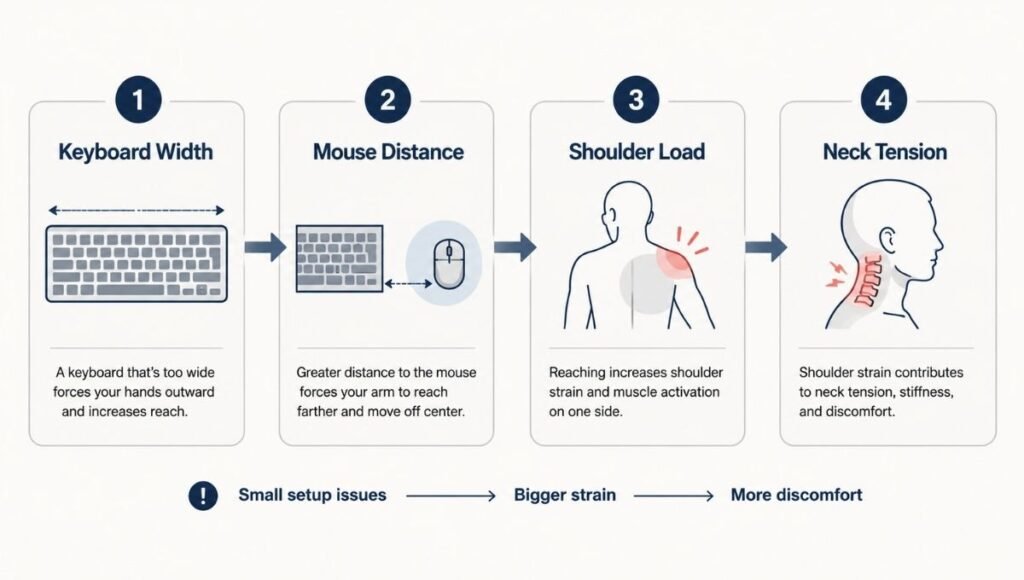
Here’s something most ergonomic guides don’t say clearly enough: your keyboard, mouse, wrist rest, and desk height are a system. Change one and the others need to adjust.
If your desk is too high, your keyboard is too high, which bends your wrists upward, which means a wrist rest that would otherwise be helpful becomes irrelevant. If your keyboard is too wide (full-size with number pad), your mouse ends up further right, which increases shoulder reach with every click. If your mouse is vertical but positioned incorrectly, the posture benefit is partially negated.
An effective ergonomic office setup rests on six core components: desk height, monitor placement, seating, lighting, movement, and input devices. Miss one, and the others can’t fully compensate. Think of your workspace as a system. Your chair affects your posture. Your posture affects where your eyes fall on the screen. Your screen position affects your neck. Your input devices affect your shoulders, wrists, and hands. Everything connects.
This guide works through the system in order — foundation first, then input devices, then the accessories that complete it.
Step 1: Establish the Foundation (Chair and Desk Height)
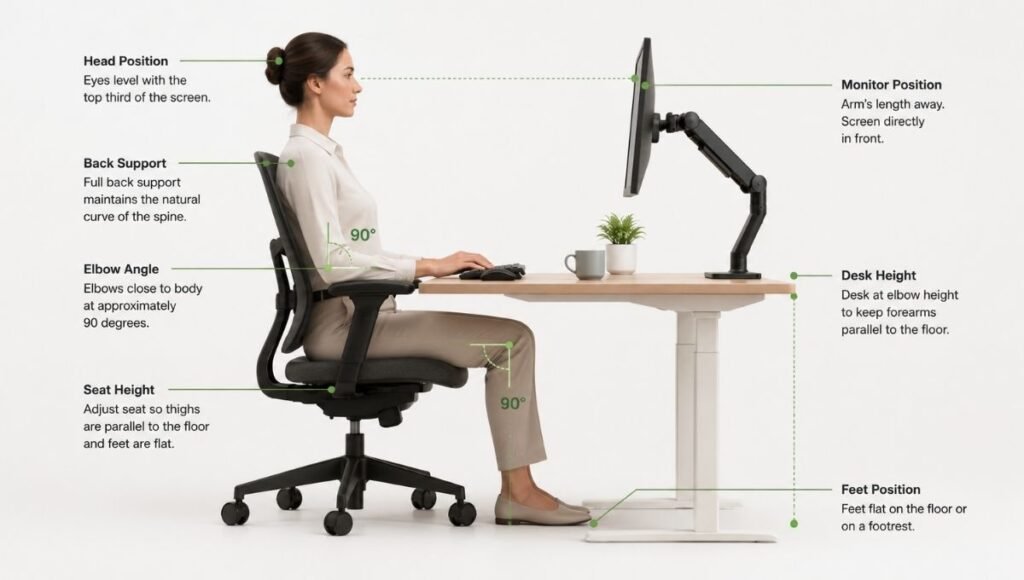
Before touching your keyboard or mouse, your chair and desk height need to be correct. Everything else calibrates from there.
Chair height: Sit with your feet flat on the floor. Your thighs should be roughly parallel to the ground, knees at approximately 90 degrees. Leave 1–2 inches between the seat edge and the back of your knees. If your feet don’t reach the floor at the correct seat height, use a footrest.
Desk height: Your keyboard and mouse should sit at the same level as your elbows, keeping your wrists neutral and straight. For most adults sitting in a properly adjusted chair, this is 28–30 inches from the floor. If your desk is fixed at the wrong height and can’t be adjusted, a keyboard tray mounted under the desk surface can lower your typing position to the correct level.
The test: Sit in your normal working position. Let your arms hang naturally from your shoulders. Bend your elbows to approximately 90 degrees. Your hands should land at or just above desk level. If you have to raise your shoulders or bend your wrists upward to reach the keyboard, your desk or keyboard position is too high.
Step 2: Configure Your Keyboard Position and Type
With your desk at the right height, keyboard placement becomes straightforward — but there are several decisions within it that significantly affect wrist and shoulder health.
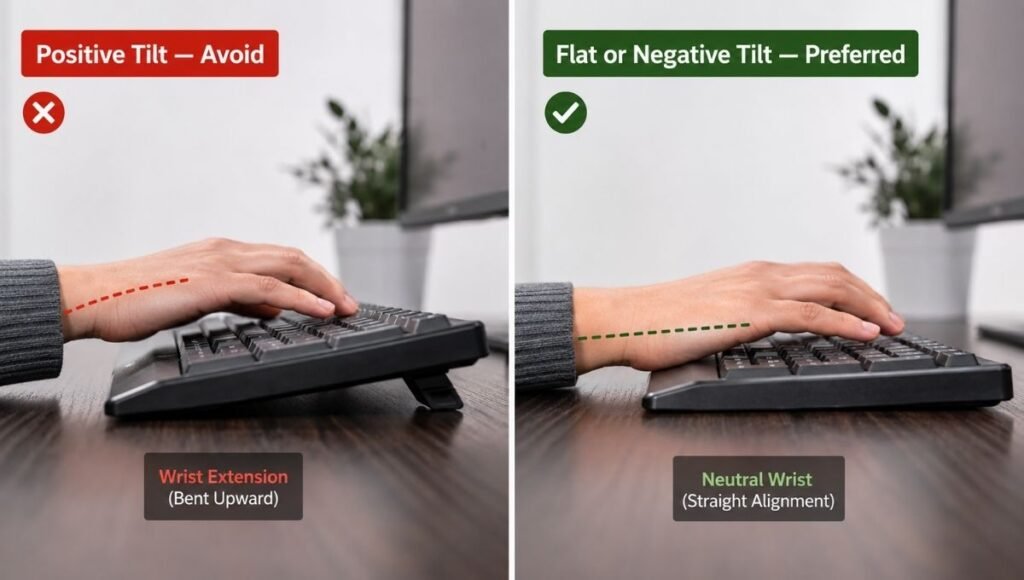
Keyboard Distance and Angle
Position your keyboard so your upper arms hang vertically from your shoulders when typing. Your elbows should be close to your sides, not extended outward. If you’re reaching forward to type, the keyboard is too far away.
Many built-in keyboard feet actually create a positive tilt (back higher than front), which increases wrist extension; keeping those feet folded down or using a platform that allows negative tilt is usually more wrist-friendly. This is one of the simplest and most overlooked adjustments — the small legs on the back of most keyboards create a slight upward tilt that bends your wrists throughout every typing session.
Center the “B” key with your belly button. This keeps your hands symmetrically positioned and reduces the asymmetric reaching that causes one-sided shoulder and wrist loading.
Keyboard Size and Layout
Keyboard width directly affects mouse positioning. A full-size keyboard with a number pad pushes your mouse 3–4 inches further to the right than a tenkeyless (TKL) or compact keyboard. Compact layouts are superior because they prevent your shoulder from “reaching” outward, which is a common cause of neck knots.
If you use a number pad regularly, consider a separate number pad positioned to the left of your keyboard rather than built into the right side. This allows your mouse to stay close to your keyboard center without moving it further right.
Ergonomic Keyboard Types
Standard rectangular keyboards force your hands into an inward angle (ulnar deviation) that loads the wrist joints and carpal tunnel with sustained typing. Split or tented ergonomic keyboards are designed so your forearms and wrists don’t have to angle inward toward the center, which may reduce strain for people who type many hours a day.
The three main ergonomic keyboard categories:
Wave/curved keyboards keep the layout on one piece but curve it to follow the natural arc of the fingers. Minimal adaptation required. Good starting point for people experiencing mild wrist fatigue.
Split keyboards divide into two independent halves, allowing you to position each at shoulder width. Eliminates ulnar deviation entirely. Adaptation takes 2–4 weeks but addresses the root cause more directly than wave designs.
Alice layout keyboards angle the two halves outward on a single connected piece. Middle ground between standard and fully split — partially reduces ulnar deviation with less adaptation than a true split.
→ For detailed guidance on choosing and adapting to an ergonomic keyboard: Best Ergonomic Keyboard for Home Office: How to Choose the Right Type
Step 3: Position Your Mouse Correctly
Mouse positioning is consistently underestimated as an ergonomic factor. The average office worker clicks a mouse 5,000+ times per day. Each click requires the same small motion, the same muscle activation, the same joint position. Multiply that by 250 workdays per year, and you’ve performed over 1.25 million repetitive movements annually with one hand.
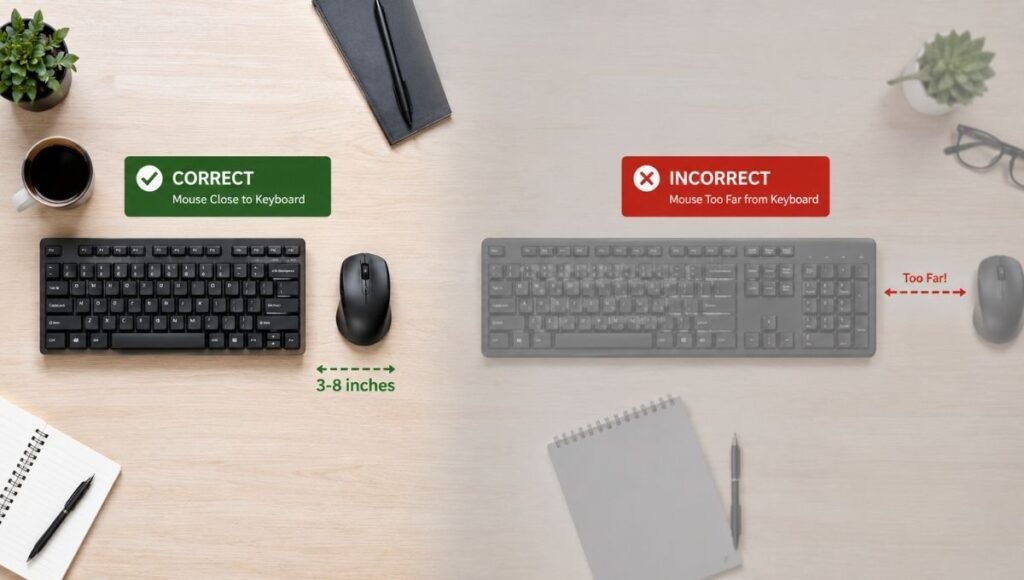
Distance: The Most Correctable Mouse Problem
Take action today: Measure the distance from your keyboard’s center to your mouse. If it’s more than 8 inches, consider adjusting your keyboard placement or exploring a centered pointing device.
The correct mouse position: directly beside your keyboard, within comfortable reach without extending your arm. When you grip the mouse, your upper arm should hang naturally from your shoulder without elevation or rotation.
If you use a full-size keyboard with a number pad on the right, the number pad is likely forcing your mouse 3–5 inches further right than optimal. Switching to a TKL keyboard is one of the fastest ways to improve mouse positioning without changing anything else.
Mouse Type: Matching the Device to Your Pain Pattern
Different mouse types address different ergonomic problems. The right choice depends on where your discomfort is located.
Standard ergonomic (contoured) mouse: Improved shape and palm support without changing the fundamental grip orientation. Best for general hand fatigue without specific joint issues. Minimal adaptation required.
Vertical mouse: Vertical mice are often effective for wrist pain and carpal tunnel symptoms because they rotate your grip to a handshake position, reducing forearm pronation by 60–90 degrees. Best for forearm and wrist ache that builds through the day.
Trackball mouse: Eliminates arm movement entirely — your hand stays stationary while your thumb or fingers control the cursor. Best for shoulder and upper arm fatigue from repetitive sweeping movements. Steepest adaptation curve (2–4 weeks).
→ For a complete comparison of ergonomic mouse types with specific recommendations: Ergonomic Mouse Types Compared: Vertical, Trackball, or Standard
→ For in-depth vertical mouse research and product recommendations: Vertical Mouse: Does It Actually Work? What Research and Users Say
Step 4: Add the Supporting Accessories
With keyboard and mouse correctly positioned, a few accessories complete the ergonomic system.
Wrist Rest: Used Correctly, Not Continuously
A wrist rest provides a soft surface for your wrists during pauses from typing — not during active typing. This distinction matters: research from UC Berkeley found that using a wrist rest during active typing can double the pressure inside the carpal tunnel.
Float wrists; use rests only between bursts. When you pause to think, read, or wait, your wrists land softly on the rest. When you type, they float freely above the keyboard.
The wrist rest height should match the front edge of your keyboard. Too tall creates wrist extension; too short provides no support benefit.
→ For wrist rest mechanics, correct technique, and recommendations: Keyboard Wrist Rest: Do You Need One and Are You Using It Right
Keyboard and Mouse Together: The Combo Decision
For people setting up a new input device system rather than upgrading individual pieces, a wireless keyboard and mouse combo simplifies the purchase and guarantees wireless compatibility through a single receiver.
The key decision within combos: with or without a trackpad. For sustained work sessions, a keyboard case or combo with a trackpad eliminates the constant arm-reaching that breaks workflow during long typing sessions.
→ For combo recommendations by use case and budget: Wireless Keyboard and Mouse Combo for Home Office
iPad Keyboard: When Your Tablet Is Your Primary Input Device
For home office setups where an iPad serves as primary or secondary computer, keyboard selection involves an additional decision layer: keyboard case (keyboard + cover in one unit) versus standalone Bluetooth keyboard used with a separate stand.
For desk-based iPad users, the standalone Bluetooth keyboard + tablet stand approach is almost always more ergonomic — it allows the iPad screen to be positioned at eye level while the keyboard sits at elbow height, the same correct separation that makes laptop stands valuable.
→ For iPad keyboard types, compatibility, and recommendations: Best Bluetooth Keyboard for iPad: How to Choose and Which to Buy
Step 5: Monitor Position (The Input Device Connection)
Monitor position directly affects how your input devices work. A screen that’s too low pulls your head and neck forward, which shifts your shoulder position, which affects how your arms reach the keyboard and mouse.
Place the computer monitor straight in front of you, directly behind your keyboard, about an arm’s length away from your face. The monitor should be no closer to you than 20 inches and no further away than 40 inches.
The top of your monitor should be at or slightly below eye level when you’re sitting with correct posture. Looking slightly downward at the screen is the natural resting position for the eyes and cervical spine — not straight ahead, not upward.
If you use a laptop as your primary computer, the screen is almost certainly too low when the laptop sits on a desk. A laptop stand raises the screen to the correct height; pair it with an external keyboard and mouse so your hands stay at the correct lower position.
Step 6: Movement — The Adjustment No Accessory Replaces
Even the perfect ergonomic office setup can’t overcome one problem: sitting in any position for hours damages your body. The best posture is your next posture. Movement matters more than perfection.
The 20-20-20 rule applies beyond eye strain: every 20 minutes, look away from your screen for 20 seconds. Use this moment to also drop your hands to your sides, roll your shoulders, and shift your sitting position. This micro-break pattern prevents the cumulative stiffness that develops during focused work sessions.
For people sitting more than six hours daily, a standing desk or desk converter allows position alternation throughout the day. The goal isn’t to stand all day — sustained standing creates its own problems — but to break up long sitting periods with 15–20 minute standing intervals.
The Ergonomic Desk Setup Checklist
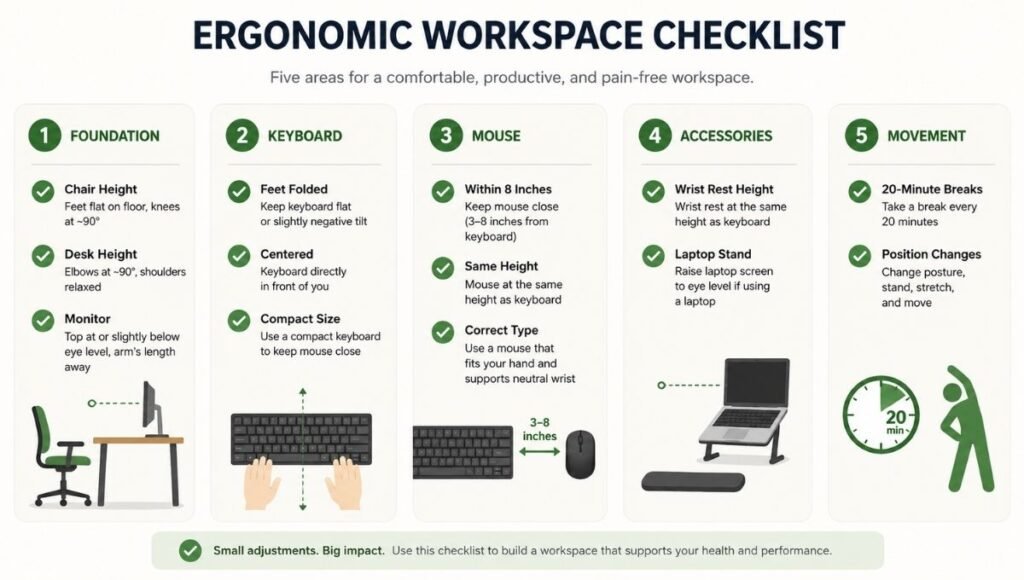
Use this to verify your complete input device system is correctly configured.
Foundation
- Chair height: feet flat on floor, knees at ~90 degrees, 1-2 inch gap behind knees
- Desk height: elbows at ~90 degrees, forearms roughly parallel to floor when typing
- Monitor: arm’s length away, top at or slightly below eye level
Keyboard
- Keyboard feet folded down (negative tilt or flat preferred over positive tilt)
- Upper arms hanging naturally from shoulders when typing
- B key centered with belly button
- Keyboard size appropriate — TKL or compact if mouse reach is a problem
Mouse
- Positioned directly beside keyboard, within 3–8 inches
- Same surface height as keyboard
- Mouse type matched to primary discomfort location
Supporting Accessories
- Wrist rest height matched to keyboard front edge (if using one)
- Wrist rest used during pauses only, not active typing
- Laptop stand if using laptop as primary display
Movement
- 20-minute movement reminder set
- Position changes throughout the day
Common Ergonomic Setup Mistakes
Keyboard too far from body. If you’re reaching forward to type, your shoulders are elevated and your back is slightly rounded. Move the keyboard closer.
Mouse too far right. The most common single source of shoulder and neck tension from computer use. Measure the distance from keyboard center to mouse center — more than 8 inches is too far.
Keyboard feet raised (positive tilt). Creates wrist extension that loads the carpal tunnel throughout every typing session. Fold them down.
Wrist rest used during active typing. The rest is for pauses. Using it while your fingers move compresses the wrist structures it’s meant to protect.
Monitor too low. Pulls the head and neck forward, which shifts the entire upper body posture and creates the cervical tension that makes afternoon screen work uncomfortable.
Adjusting equipment without adjusting habits. A vertical mouse used with a tense grip and no movement breaks will underperform a standard mouse used correctly with regular micro-breaks.
When to See a Professional
Ergonomic adjustments address discomfort from suboptimal positioning. They don’t treat established injuries or active conditions.
See a physiotherapist or occupational health professional if: you have tingling or numbness in your fingers or hand; pain is present when you’re not using the computer; symptoms have persisted more than a few weeks despite setup changes; or you have a diagnosed condition like carpal tunnel syndrome, tendinitis, or RSI.
These conditions respond well to early professional intervention. Ergonomic setup is prevention — the better it’s implemented before symptoms develop, the less likely you are to need treatment.
FAQs
What is the correct keyboard height for an ergonomic desk setup? Your keyboard should sit at approximately elbow height when you’re seated correctly — elbows at about 90 degrees, upper arms hanging naturally from your shoulders. Your forearms should be roughly parallel to the floor when typing, with wrists neutral (neither bent upward nor downward). If your wrists bend upward to reach the keys, your keyboard or desk is too high.
How far should my mouse be from my keyboard? No more than 3–8 inches from your keyboard center. A mouse positioned further than 8 inches requires repeated shoulder extension with every reach. The fastest fix: switch to a tenkeyless or compact keyboard if you currently use a full-size model with a number pad pushing your mouse to the right.
How do I prevent carpal tunnel from keyboard and mouse use? Keep wrists in neutral position during typing (not bent upward), use a keyboard with the feet folded down or negative tilt, position your mouse within 3–8 inches of your keyboard, consider an ergonomic mouse type that reduces forearm pronation, and take movement breaks every 20–30 minutes. If symptoms are already present, see a healthcare provider alongside making setup adjustments.
Do I need an ergonomic keyboard for a home office? Not necessarily immediately. Correct positioning of a standard keyboard — at the right height, with feet folded down, close to your body — eliminates many of the primary issues. If you type 4+ hours daily and experience wrist or forearm fatigue despite correct positioning, an ergonomic keyboard (wave, split, or Alice layout) addresses the root cause more directly.
What’s the most important part of an ergonomic desk setup? Chair height and desk height form the foundation — everything else calibrates from there. Among input devices, mouse positioning (distance from keyboard) is the most commonly wrong and most easily corrected factor. Among equipment choices, any screen set too low creates forward head posture that affects the entire upper body. Fix the foundation first, then address input devices.
Build It Right, Then Maintain It
An ergonomic desk setup isn’t a one-time configuration — it’s a system you calibrate and maintain. Your chair settles. Your posture habits drift. Equipment changes. Periodic rechecks using the checklist above keep the system working.
The payoff is straightforward: less pain, more sustainable working hours, and the absence of the low-grade physical friction that accumulates from years of working in a suboptimal position. The investments required are mostly in time and attention rather than money — correct keyboard height costs nothing, and moving your mouse three inches closer costs even less.
Everything Covered in This Guide
- Best Ergonomic Keyboard for Home Office: How to Choose the Right Type →
- Ergonomic Mouse Types Compared: Vertical, Trackball, or Standard →
- Vertical Mouse: Does It Actually Work? What Research and Users Say →
- Keyboard Wrist Rest: Do You Need One and Are You Using It Right →
- Wireless Keyboard and Mouse Combo for Home Office →
- Best Bluetooth Keyboard for iPad: How to Choose and Which to Buy →
References
- Cornell University Ergonomics Research Laboratory. Keyboard and Mouse Ergonomics. https://ergo.human.cornell.edu/
- NIOSH/CDC. Musculoskeletal Health Program — Computer Workstations eTool. https://www.cdc.gov/niosh/topics/ergonomics/
- OSHA. Computer Workstations eTool — Keyboards. https://www.osha.gov/etools/computer-workstations/components/keyboards
- Mayo Clinic. Office ergonomics: Your how-to guide. https://www.mayoclinic.org/healthy-lifestyle/adult-health/in-depth/office-ergonomics/art-20046169
- Rempel, D., et al. Effect of wrist rest use during computer keyboard work on wrist extensor muscle activity. UC Berkeley Human Factors Research.