
You’ve looked at that tangle of cables behind your desk long enough.
There’s probably a specific cable situation you’ve been tolerating for months — the monitor cable that snakes across the desk surface, the power strip sitting on the floor collecting dust, the charging cable that disappears behind everything when you unplug it. None of it is catastrophic. All of it is mildly annoying, every single day.
The reason most people don’t fix it is that cable management sounds like a weekend project involving tools, measuring tape, and cable raceways mounted along the wall. It doesn’t have to be. Most home office cable chaos can be solved in about 20 minutes with $20–30 of supplies, no drilling required.
The key is doing it in the right order. Most guides tell you to buy cable clips and velcro ties without explaining that these only work well once the bigger problems — the power strip location, the cable routing plan — are already sorted. Start with clips on a desk that still has a power strip on the floor and you’ve tidied the surface without fixing anything fundamental.
This guide works through it in the right sequence.
Key Takeaways
- Cable management done in the wrong order creates the illusion of tidiness without solving the root problem — start with the power strip position, then route cables, then organize the surface
- A University of California study found that visual clutter directly competes for cognitive resources — a desk with cables draped across it is mildly taxing your attention every time you look at it
- The under-desk cable tray is the single highest-impact cable management purchase for most home offices — it takes a floor-level power strip and hides it completely under the desk surface for $15–25
- Velcro cable ties outperform zip ties for desk use — they’re reusable and adjustable when you inevitably move or change devices; zip ties require cutting and replacing every time
- Switching to wireless keyboard and mouse eliminates 2–3 desk surface cables permanently and costs less than most cable management systems
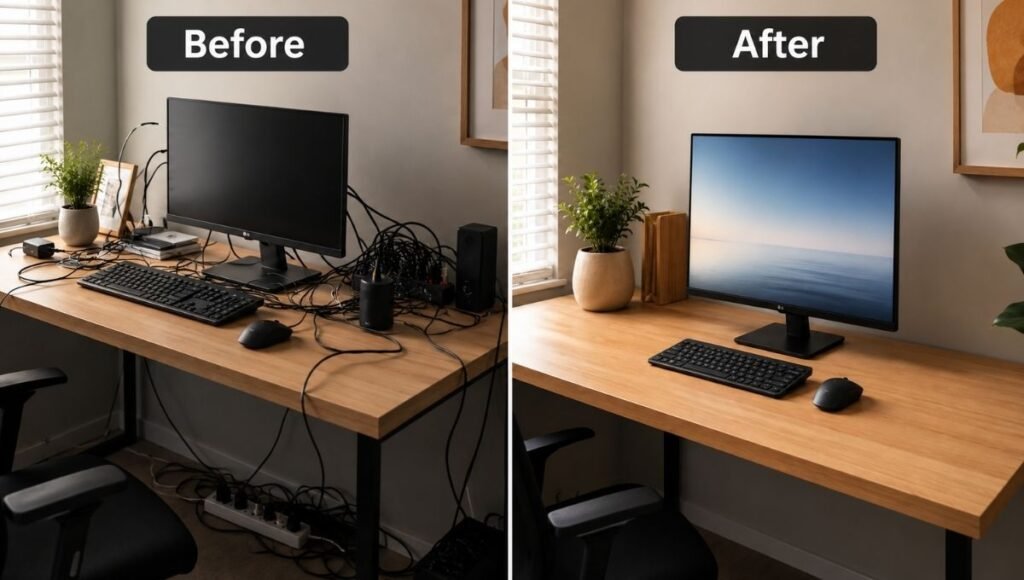
Why Your Cable Management Keeps Failing
Most people have attempted some version of cable management. They bought a pack of cable clips. They organized the cables once. Three months later, it looked the same as before.
The problem is usually one of three things.
The power strip is in the wrong place. If your power strip sits on the floor or on the desk surface, every cable has to travel to that location — across the floor, up the desk leg, or across the surface. The cables follow the power strip. Move the power strip to the right location and most cable routing problems solve themselves.
Cables are longer than necessary. Most cables that come with devices are 6 feet long, designed to reach outlets in any configuration. On a desk where everything is within 3 feet of each other, that extra length has nowhere to go except into a pile. Shorter replacement cables ($5–10 each) eliminate the coiling and bundling that makes cable management feel endless.
The system requires maintenance to stay tidy. Good cable management is passive — cables stay where they’re routed without you doing anything. If your system requires constant adjusting, clipping, and tidying, it’s not the right system for how you actually use the desk.
The 20-Minute Cable Management Plan
Work through these steps in order. Each step makes the next one easier.
Step 1: Unplug Everything and Start Fresh (3 minutes)
Unplug all devices. Move everything off the desk surface. This is not optional — trying to organize cables while devices are in use means you can’t see the full routing picture and you’ll miss obvious improvements.
While everything is unplugged, identify which cables you actually need and which ones are living on your desk out of habit. The USB-A cable for a device you don’t use anymore. The HDMI cable from a monitor that’s now connected by DisplayPort. The phone charger for a phone you replaced. These can be removed entirely.
Step 2: Mount the Power Strip Under the Desk (8 minutes)
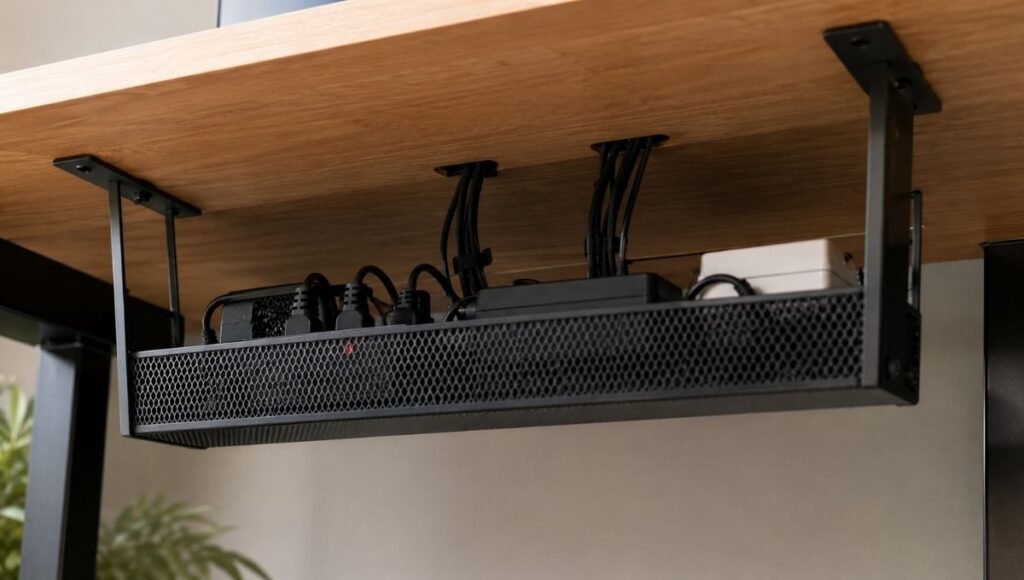
This is the single most impactful change you can make to a home office desk. A power strip mounted under the desk surface means zero cables need to travel to the floor. Every device cable stays entirely above desk level — shorter runs, cleaner routing, no floor cables to vacuum around.
Under-desk cable tray ($15–25): A metal mesh or steel tray that screws or clamps to the underside of the desk. Your power strip sits inside it, completely hidden. Cables come up from the tray to the devices on the desk surface. The VIVO Under Desk Cable Management Tray is the most commonly recommended option — solid construction, easy installation, fits most standard power strips.
No-drill option: Cable management trays with clamp-on mounting attach to the desk edge without screws. Slightly less stable but completely reversible. Suitable for rental setups or desks you don’t want to drill into.
Once the power strip is under the desk, route all device power cables down through the back of the desk and into the tray. This single step eliminates most visible cable chaos.
Step 3: Bundle and Route Cables Along the Desk Edge (5 minutes)
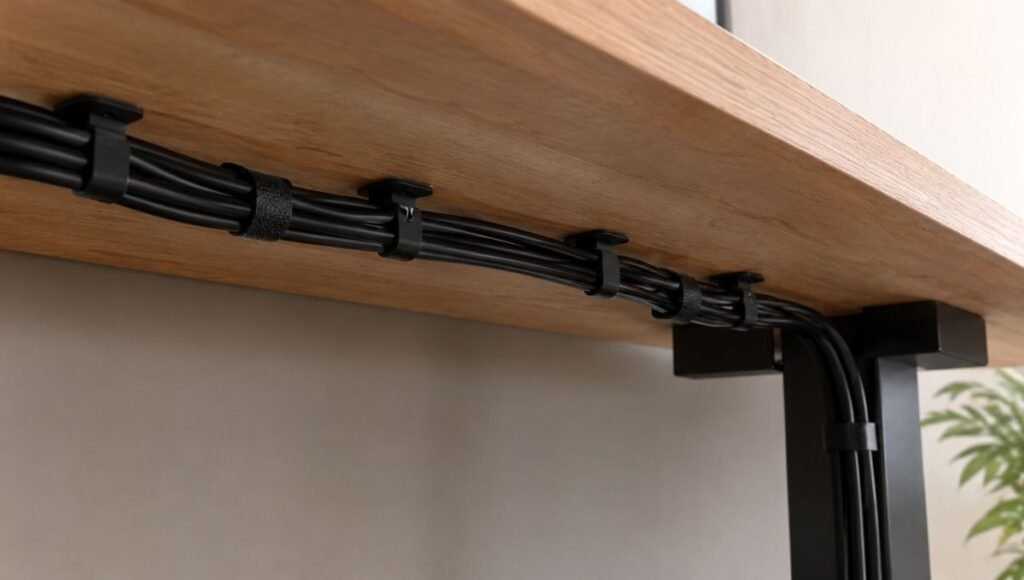
With the power strip in place, you can see the natural routing paths — where cables need to travel from device to power source, and which cables run in the same direction.
Group cables that go the same way. Monitor power cable and monitor display cable both go to the back right corner — bundle them together. Laptop charger and USB hub cable both go to the under-desk tray — run them together.
Velcro cable ties ($8 for a large pack): Wrap bundles together every 12–18 inches. Velcro rather than zip ties — when you need to add a cable or change a device, you open and close rather than cut and replace.
Adhesive cable clips ($10 for a pack of 50): Stick to the underside of the desk or along the desk edge to hold bundled cables in place. Route cables along the back edge of the desk, clip them every 6–8 inches, and they stay exactly where you put them without drifting forward across the surface.
The routing path: cables should go from the device, along the back edge of the desk (held with clips), down through a back corner, and into the under-desk tray. From front to back to down — nothing visible from the normal seated working position.
Step 4: Address Surface Cables (4 minutes)
After routing everything down and back, take stock of what’s left on the desk surface.
Cables that legitimately need to be accessible — like a USB cable you plug and unplug frequently, or a phone charger — can be held with desk-edge cable clips so they’re always findable without creating a tangle. One clip at the desk edge keeps the cable end accessible without it disappearing behind the desk.
Display cables running from monitor to laptop or dock should be the only cables visible on the desk surface, and they should run directly — no excess length coiling anywhere.
Wireless peripherals eliminate desk surface cables entirely. If you’re still using a wired keyboard and mouse, switching to wireless ($35–60 for a quality combo) removes 2–3 desk surface cables permanently. This is often more effective than any amount of cable management.
Desk Cable Organizer Options: What to Buy and When
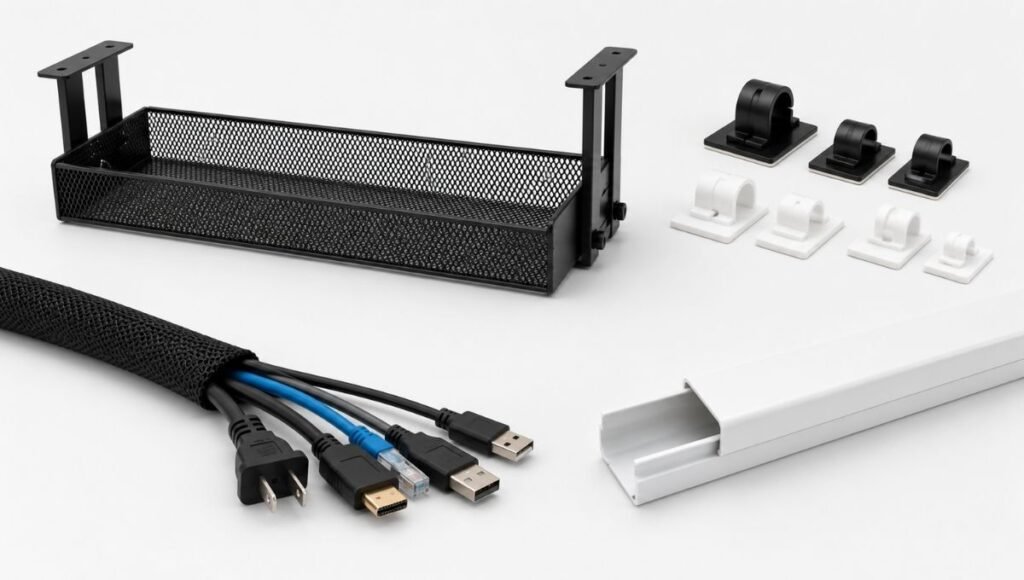
Different cable situations call for different tools. Here’s what actually works for each problem.
For Hiding the Power Strip: Under-Desk Cable Tray
Best for: Everyone. This is the foundation.
The VIVO Under Desk Cable Management Tray (~$18–22) mounts under the desk with four screws, holds a standard power strip and adapters, and has a mesh design that allows airflow to prevent heat buildup. Installation takes 10 minutes with a screwdriver.
For no-drill setups: the J-Channel Cable Management Raceway Kit ($15–20 for 96 inches) sticks to the underside of the desk edge using adhesive strips and holds cables in a covered channel, hiding them from view without screws.
For Bundling Cables: Velcro Ties and Cable Sleeves
Best for: Multiple cables running the same direction.
Velcro cable ties in a large pack ($8–10) handle most bundling needs. Reusable, adjustable, won’t damage cables the way zip ties can if over-tightened.
Cable sleeves ($10–15 for a set) bundle multiple cables into a single tube — particularly good for monitor cables and laptop charger cables that are too thick for velcro alone. The fabric braided type is easiest to add or remove cables from.
For Routing Cables Along Surfaces: Cable Raceways
Best for: Cables that need to travel along a wall or desk edge.
Cable raceways are plastic channels that mount to surfaces with adhesive strips. Run cables through them and snap the cover on — cables become completely invisible. The J-Channel raceway style is the most versatile — available in white or black to match most desk setups, in lengths from 12 to 96 inches.
Particularly useful for: the cable that runs from the under-desk power strip down the desk leg to the wall outlet, and for running monitor or ethernet cables along a wall to reach the router.
For Surface Organization: Cable Clips and Cable Boxes
Best for: Desk surface tidiness and accessible cable ends.
Adhesive cable clips ($10 for 50) hold individual cables along the desk edge — phone charger, USB cable, headphone cable — so they’re always findable without creating a tangle. One clip per cable at the desk edge is the cleanest approach.
Cable management boxes ($20–30) hide a power strip and short cable runs in a box that sits on or under the desk surface. Less effective than a mounted under-desk tray but requires no installation — useful for renters or temporary setups.
Under Desk Cable Management: The Most Overlooked Zone
The space under your desk is the most overlooked opportunity in home office organization. Properly used, it becomes invisible storage for everything that would otherwise create surface clutter.
Beyond the power strip tray, consider:
Cable net or hammock ($12–18): A mesh net that mounts under the desk, holding excess cable length, adapters, and anything else that doesn’t need to be accessed frequently. Laptop charging bricks, USB hubs, and ethernet switches all disappear into a cable net — out of sight, accessible when needed, not consuming desk surface space.
Under-desk hooks ($8–12 for a pack): Adhesive hooks on the underside of the desk hold headphones when not in use, keeping them off the surface without requiring a separate headphone stand.
Monitor arm cable routing: If you use a monitor arm, most arms have internal cable management channels — the monitor cables route through the arm itself rather than hanging loose. This single change eliminates the most visible set of cables on most desks.
Cable Management for Specific Setups
Dual Monitor Setup
Two monitors mean two power cables, two display cables (HDMI or DisplayPort), and potentially a USB hub cable. Cable management priority: bundle both monitor cable sets together and route them through the monitor arms (if used) or along the back of the desk together. One velcro-bundled run for both monitors looks significantly cleaner than two separate runs.
→ See our Dual Monitor Setup Guide → for monitor positioning and cable routing specific to dual-screen configurations.
Laptop Plus External Monitor
The most common setup in home offices. The laptop charging cable and the monitor display cable are the two primary cables to manage — both should route to the back of the desk and down to the under-desk tray. If you use a docking station or USB-C hub, all peripheral cables (keyboard, mouse, ethernet) connect to the dock, leaving only one cable between the laptop and the dock visible on the desk surface.
→ See our Thunderbolt Dock for Home Office → guide for how a dock eliminates most cable management complexity in one purchase.
Standing Desk Cable Management
Standing desks require flexible cable management — cables need enough slack to accommodate the full height range without pulling tight or creating excess length at one position.
Use velcro ties rather than rigid cable management for any cables that span from the desk to a fixed point (wall outlet, floor). Leave 2–3 feet of slack specifically for the height adjustment range. Route cables through a cable sleeve that can flex with the desk movement rather than a rigid raceway that can’t.
If You Only Have 10 Minutes Right Now
Do one thing: mount your power strip under the desk.
If you don’t have an under-desk tray, use two strong adhesive strips or S-hooks to temporarily suspend the power strip from the underside of the desk. It’s not as clean as a proper tray, but it immediately moves the power strip off the floor and starts the cable routing process.
Order the VIVO cable management tray ($18) to arrive this week. When it comes, spend 10 minutes doing a proper installation. That one change eliminates more visual cable chaos than any amount of clips, ties, or organization systems applied to cables that are still routing incorrectly.
FAQs
What is the best desk cable organizer for home office? For most setups, an under-desk cable management tray ($15–25) is the highest-impact single purchase — it mounts the power strip underneath the desk, removing floor cables and giving all other cable management a clean starting point. For surface organization, adhesive cable clips (pack of 50 for $10) keep accessible cables tidy without major installation.
How do I manage cables under my desk without drilling? Clamp-on cable management trays attach to the desk edge without screws. Adhesive cable raceways and clips stick to desk undersides and surfaces with strong adhesive strips. Cable management boxes sit on or under the desk surface without mounting. All are reversible and suitable for rental setups.
What’s the difference between a cable raceway and a cable sleeve? A cable raceway is a rigid channel that mounts to a surface — best for routing cables along walls or desk edges in a fixed path. A cable sleeve is a flexible tube that bundles cables together without mounting — best for cables that need to move or that run between devices on the desk surface. Both serve different purposes and many setups use both.
How do I keep cables from getting tangled? Route cables along fixed paths using clips rather than leaving them loose. Bundle cables going the same direction with velcro ties. Use shorter cables where possible — excess length creates the loops and piles that tangle. For cables you plug and unplug frequently, a desk-edge clip keeps the end accessible without the cable disappearing behind the desk.
Is wireless keyboard and mouse worth it just for cable management? Often yes. A quality wireless keyboard and mouse combo ($35–60) removes 2–3 desk surface cables permanently and adds the convenience of no cord resistance during mouse movement. For most remote workers, this is a better investment than elaborate cable management for wired peripherals.
The Desk You Actually Want to Sit Down At

Cable management isn’t about aesthetics for its own sake — though a clean desk genuinely looks better. It’s about removing the small recurring friction that makes your workspace feel slightly chaotic even when everything is technically in order.
A University of California study found that visual clutter directly competes for cognitive resources. A desk with cables draped across it isn’t decorative — it’s a low-level attention tax that accumulates across a working day.
The 20-minute plan works. Start with the power strip. Route cables along the back edge. Clip them in place. The desk that results is the one you actually want to sit down at.
Related Articles on CircuitSeek
- Desk Organization Ideas That Actually Stick →
- The Complete Home Office Setup Guide →
- Wireless Keyboard and Mouse Combo for Home Office →
- Thunderbolt Dock for Home Office →
- Dual Monitor Setup Guide →
- Best Wireless Charger for Desk →
References
- McMains, S., & Kastner, S. (2011). Interactions of top-down and bottom-up mechanisms in human visual cortex. Journal of Neuroscience, 31(2), 587–597. University of California research on visual clutter and cognitive load. https://www.jneurosci.org/content/31/2/587
- HomeOfficeNomad. How to Manage Cables at Your Home Office Desk — Complete Guide 2026. https://homeofficenomad.com/desk-cable-management-home-office/
- Occupational Safety and Health Administration (OSHA). Walking-Working Surfaces — Electrical Safety and Cable Hazards. https://www.osha.gov/walking-working-surfaces